|
DIY Cheshire eyepiece
|
Do-it-yourself Collimation (Cheshire) Eyepiece
I'd like to show you a simple way to make a Collimation Eyepiece, that you can use to align your optics. Of course you can buy these in any of the shops, but If you have a little time and you're a DIY-type of person, you can easily spare some bucks with making your own Cheshire Eyepiece. Another advantage of this design is that you can use any diametre you want, you don't have to stick with the regular 1.25" size. Actually during the making of this manual, I'll create a 2" version.
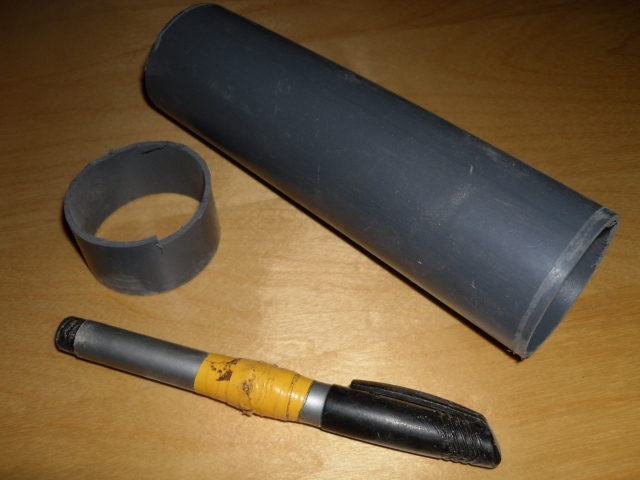
You'll need these
1. A short piece of plastic drain pipe - I'll use a 2" (50mm) pipe, for an 1.25" version you should use a 32mm pipe, although it may need some additional grinding because it's a bit larger than 1.25".
2. A piece of sketching paper
3. A piece of cardboard or thin plastic sheet - some of the components I'll create from cardboard for simpicity, but if you want to have a more durable eyepiece, you should use plastic instead, eg. the bottom of an old plastic flower pot.
4. About 4-6" (10-15cm) of bare electrical wire, preferably thin, but not too thin.
5. Some aluminium foil
6. Tools: pencil, two pins, ruler, thread, permanent marker, pliers, pinchers, a really sharp knife (eg. modeler's knife), thin saw for cutting plastics (or an angle grinder for the less patient ones), scissors, glue (one that works on all of the used materials - plastics, aluminium, paper)
7. 30 minutes of spare time
Step 1
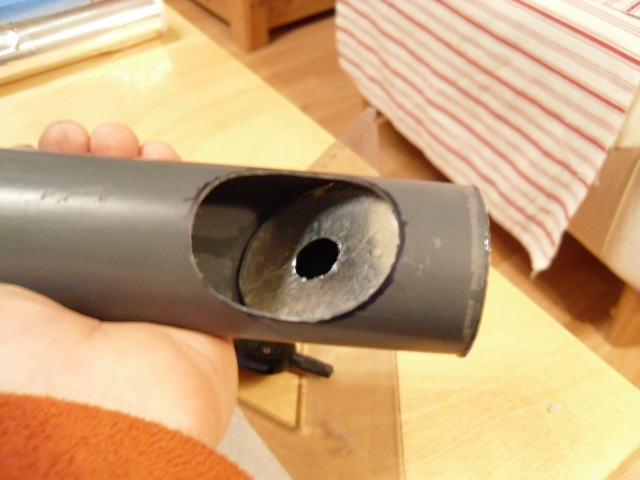
Cut a short piece from the straight plastic drain pipe - a 6-8 inch (15-20cm) piece will do. Try to make the cut as perpendicular to the side of the pipe as possible. If needed, mark the end of the pipe that is surely straight - the end with the factory cut -, that will be the end of our eyepice that holds the crosshair. We need this straight, perpendicular end because we will need it to be concentric with some parts of the telescope when we will look through the eyepiece during collimation.
Cut another tiny ring that we will use as a template later.
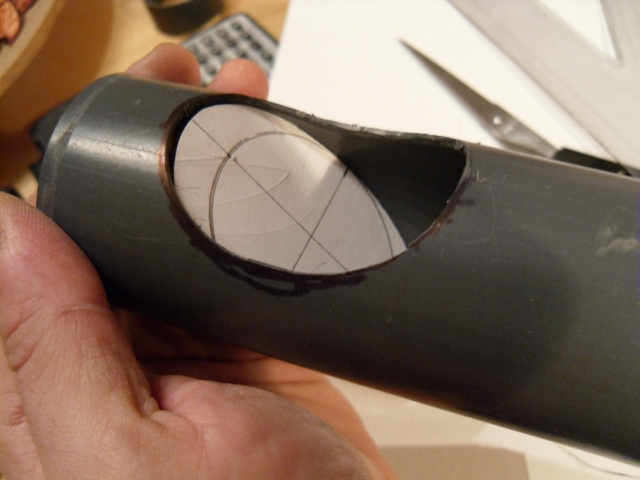
Using this template, draw a circle near the less perfect end of the pipe. When looking at the template straight, it looks like a circle. However, what you draw on the side of the pipe will be of course not like a circle, if only looked from above. So draw the line so that the tip of the marker will be always hidden by the template while you're looking at it from above.
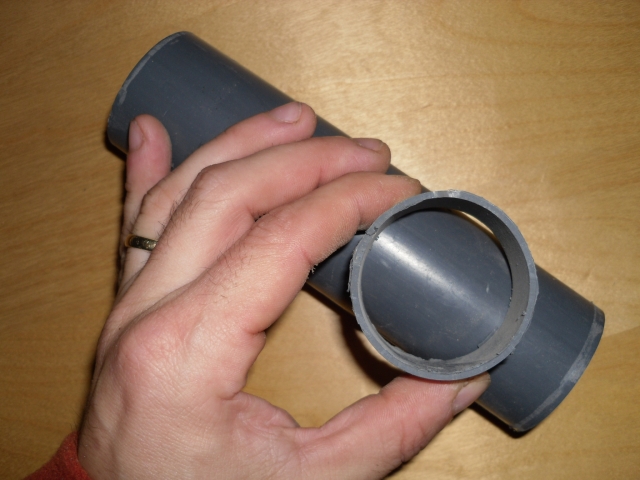
Using the saw or the angle grinder, cut out this hole from the pipe. This will be where the light will enter the eyepiece for the collimation. Using your modeler's knife, make the edges of the freshly cut components less sharp - just to avoid a future incident.
Step 2
It's time to create the diagonal mirror that lets light enter the tube. As we will assemble this mirror at a 45 degree angle into our plastic pipe, when looking at it from one end of the pipe, you should actually see a perfect circle. This, however does not mean, that this mirror will be circle shaped, instead it will have to be a perfect ellipse, just like the secondary mirror of our Newtonian telescope. So we have to draw an ellipse. No worries, I'll show you a simple way to do that!
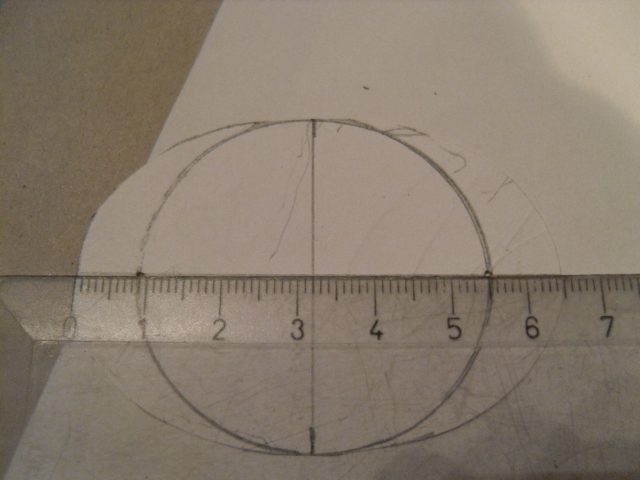
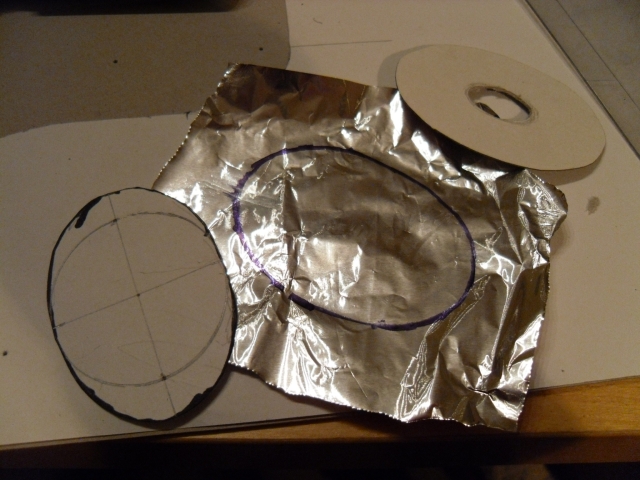
First of all, using our little template rings inner side - as the mirror will go inside our pipe -, draw a circle on a sheet of paper. When measured by a ruler, in my case this circle has a diametre of 45 mm, but this of course depends on the wall thickness of the pipe you're using. Cross this circle with a line (the line must cross the centre of the circle too) - this we will use as a guide line later. Now press the two pins into the points where the line intersects the circle. It should be useful to put a piece of cardboard or cork board under it.
Now, take a small piece of your thread, and put it around the pins the way it is pictured below. Make the two ends cross eachother in 90 degrees over the circle and make a small mark on the thread.

Make a knot on the thread so that the knot is exactly at the marked point on the ends of the thread, and put it back around the pins as pictured:
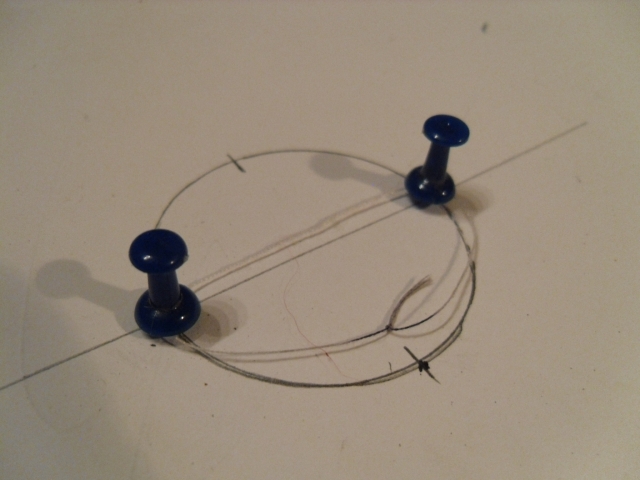
Put your pencil inside the loop of the thread, and start going around with the thread always kept as tense as possible. You'll actually draw a perfect ellipse we need!

If we measure the major axis of the ellipse (on the picture below I've already cut it out of the paper), we get about 64 millimeters. Why is this so important? Imagine our mirror from its side: as it is positioned with a 45 degree slope and we're putting it into a 45mm pipe, when looking at it sideways, we should see an isosceles right-angled triangle, with its longest side measured at square root of 2 times 45 mm. And that gives exactly 64 millimeters.
So cut the ellipse template out of the paper, and give it a try in our tube: it will fit just perfectly!
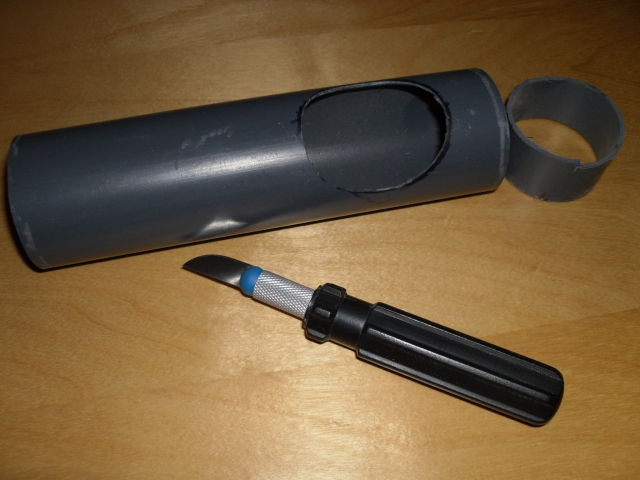
Step 3
Using out template and the cardboard/plastic sheet/aluminium foil, let's make the diagonal mirror and also the upper end of the eyepiece.
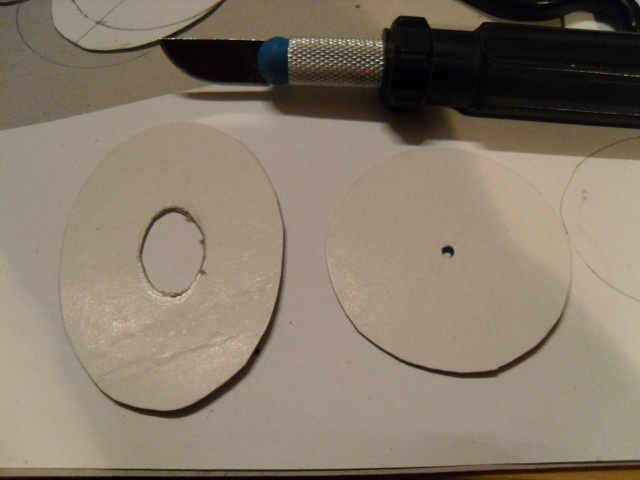
The upper end is simple: all you need to do is to draw the outer side of your tube on the cardboard of plastic sheet, and cut it out. Mark the exact centre of the circle. Now press a pin through this central point, and nicely make it wider until it reaches a diametre of about 2 millimeters. We'll observe the alignment of our optics through this hole. If the hole is too large, it will be harder to find the accurate looking angle, if it's too small, then it will be hard to find the hole itself.
For making of the diagonal mirror, use the ellipse template we just created. Transfer it to the cardboard/plastic, then cut it out. Mark its centre. For this step it is helpful to press a pin through the center of your template, that should mark the centre of the diagonal mirror also. Now draw a smaller ellipse around this central point. It doesn't needs to be perfect, but try to follow the outline of the mirror sheet. The minor axis of this smaller ellipse should be about 10 mm, but when you design the size, you should anticipate that it should be large enough for you to be able to see the outline of the lower end - that slides into your focuser - of your eyepiece. If you can't see that, your inner ellipse is too small. Making it too large however makes no harm. Now cut the smaller ellipse out of the diagonal mirror base.
Grab a small piece of aluminium foil and transfer the diagonal mirror's shape using your ellipse template. This foil will be the shiny surface of our diagonal mirror. We don't need optical quality now, as all we want it to drive some light into the OTA (Optical Tube Assembly, or simply your telescope), so the aluminium foil will do. However, some foils have different sides, with one of them being shiny and the other is somewhat matte. In this case, you should always use the more shiny side.
Cut the mirror surface out of the foil and using your glue, attach it to your diagonal mirror base. Once fixed, cut the inside ellipse out of the foil. Now our mirror is ready, all we have to do is to secure it in its place in the pipe.

If we've made everything precisely, it should fit in the tube best in a perfect 45 degree angle. You should attach it to the tube with some gel-based glue.
Attach the upper end - the circle with the 2mm hole in the centre - to the eyepice using some glue. Attach it to the end that is just next to the diagonal mirror.
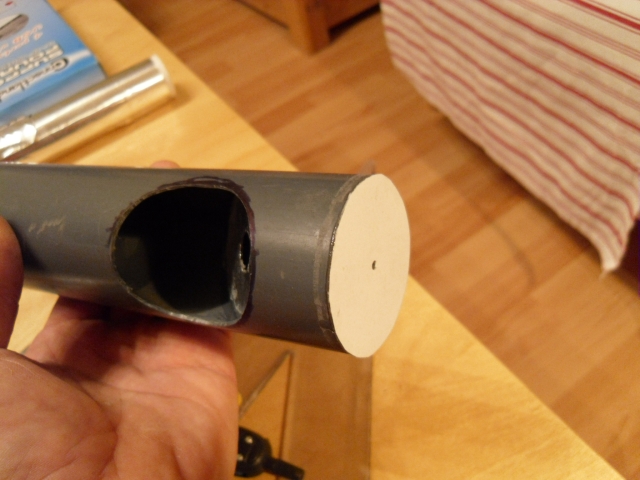
If you're looking into the tube from the open end, you should see the 2mm hole of the upper end right in the middle of the smaller ellipse (that now looks like a circle if all done well).

Step 4
Time to make the crosshair for the lower (open) end of our Collimating Eyepiece. For this we will need some electrical copper wire (actually, you can experiment with other kinds of wires too, but I fount solid copper wires to be the ideal candidate for this purpose). It shouldn't be too thin nor too thick, but if you have to choose, it's still better to use a thick wire, because at least it's easy to work with. Using a paper template, make markings at the open end of the eyepiece tube for every 90 degrees. This will help us find the right spot for our crosshair.

Time to go to the kitchen. Really. Turn on the stove - I think a gas stove is better than the electrical one in this case. Grab a piece of wire with your pliers and heat it up to a point when it's hot enough to melt through plastic. If you're unsure, practice on waste drain pipes first.
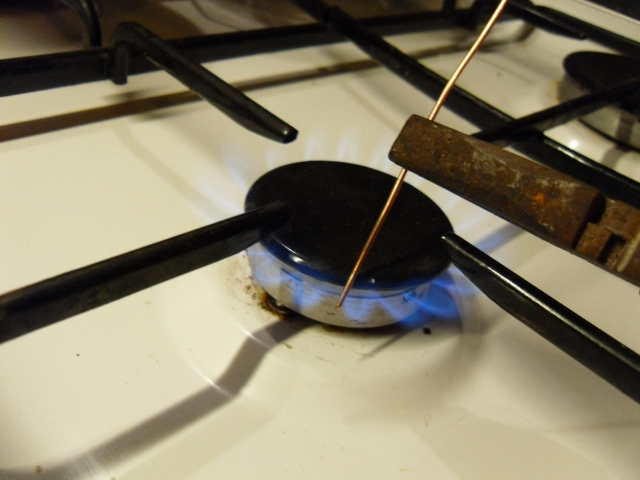
So after about 10-20 seconds of heating, try to push it through the pipe at one of the markings.
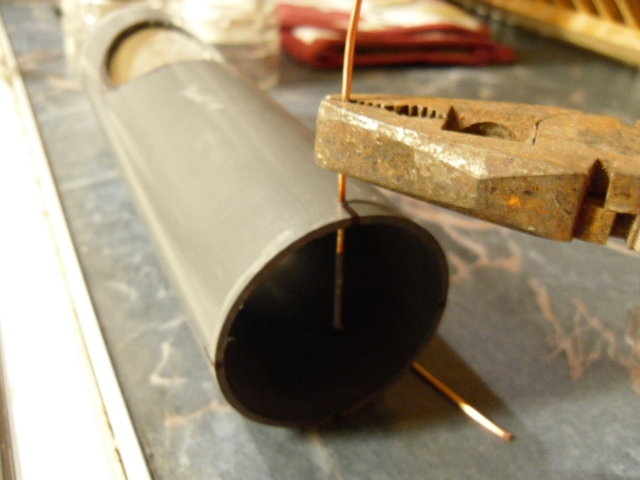
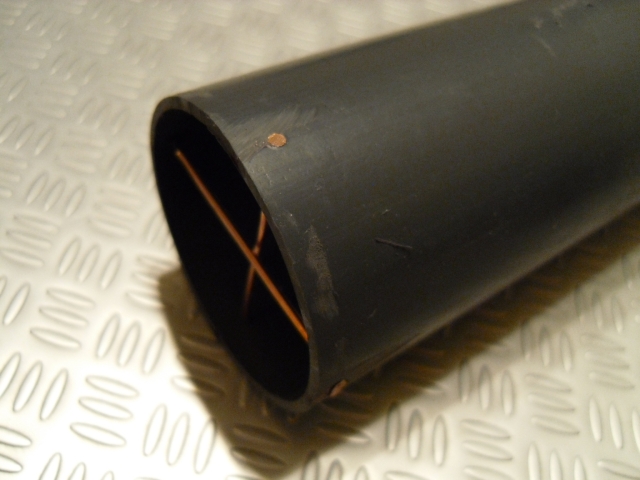
Pull it out and heat it up again and push it through the pipe on the opposite side. When done, push it through the whole tube. Do the same trick also with the other wire of the crosshair. If the wires are not straight enough after these maneuvres, you should make them more tense. To do this, lower one end of the wire, and gently pull the other end while lowering that one too. Don't use too much force as a too tense wire will deform the circular shape of your pipe, and that would ruin the performance of your Cheshire Eyepiece.
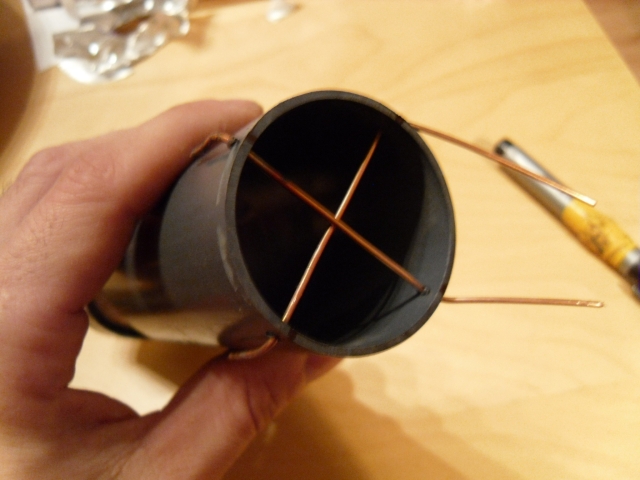
Now pinch the excess ends of the wires. If needed - and probably it is -, grind the ends to be in line with the outside wall of the tube.
Apply a little glue to the crosshair at the inside of the tube if you feel like they are a bit loose. It wouldn't be fortunate to have these wires fall on your primary mirror.
We're done!
The picture below show what you should see if you put your brand new Collimating Eyepiece into your focuser and look through the 2mm hole at the upper end of it. This guide will not explain you what is what on the picture, but I assume if you got there, you've already seen some collimation guides. I'll also create one in the not so distant future.

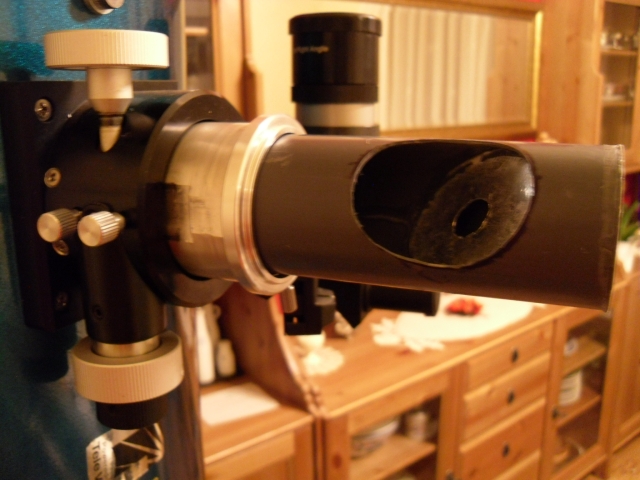
And this is how it looks when it's secured in the focuser. Make sure not to overthighten the securing screw of the focuser as it may deform the circular shape of the eyepice - remember that this is made of plastic, unlike the metal eyepieces you'll get in shops.
Please remember, that the whole accuracy of your collimation will depend on how accurately you create your Cheshire eyepiece. So take your time and if something doesn't work, just relax and give it another go.
Enjoy your brand new Collimating Eyepiece! Any feedbacks or questions are welcome!
PS. All text and pictures are copyright of Ferenc Lovró. If you'd like to use/translate/copy/alter/print them please ask for a written permission. Thank you!
|
|
|